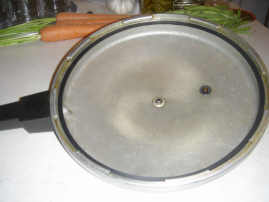
 Sealing Ring Installation Older Models The older pressure cooker sealing rings can sometimes be quite difficult to install. They consist of a thin rubber ring that fits into a groove around the inside of the lid. First off, when you purchase your new sealing ring and remove your old one and compare the two; THE NEW ONE IS BIGGER THAN THE OLD ONE. Now you may already be wondering if you have the right sealing ring and if it is going to fit! Yes, if you ordered the sealing ring for your model you have the right sealing ring. The old one over time, has heated and cooled, expanded and contracted, and has shrunk a bit. So first thing, you need to remove the old sealing ring from the pressure cooker lid and wash and clean the groove out completely, (Please note, do not bend the flange or groove while cleaning.) You must be certain that the groove is completely clean, that there are no old pieces of sealing ring or debris of any kind in the groove. This will make it impossible to install your new gasket. Then wash the new sealing ring. We personally say to use cold water and be careful not to stretch the sealing ring while your washing it. If your pressure cooker is really giving you a hard time, we suggest putting the sealing ring in ice water. We also suggest if on one that�s giving you a hard time, warming the lid with very hot water. Lay the sealing ring out on the lid. We usually start at the handle end. Start pushing and packing the sealing ring into the groove. Work around in one direction, don�t try to do both sides at the same time. Pack the ring in. Make certain not to cut any corners! The ring must be in the groove all the way around. WE REPEAT: DO NOT CUT ANY CORNERS! Now when you come around to the end, you may have something that looks like this. A loop, we like to call it "The Bubble." Make certain the ring is compacted into the groove. Keep working the ring all the way around, Pushing and Packing. Then you may need to start chasing the loop or bubble around the lid pushing and packing the ring, making certain no corners are cut. You will notice the loop or bubble getting smaller, until its only about a 1/4 of an inch, then you should be able to pop it in with your thumbs. You new sealing ring should pop in and your old pressure cooker will be good for another 40-50 years. This process can be quite Tedious and Frustrating. Just be Patient and the ring will go in. PS: While making these pictures it took another 15 minutes of pushing and packing to get the ring to finally pop in! |